Post-Mortem of your cab ride in
RAILSIM� Australian Version
Having reached your destination, you are presented with several screens showing your performance...
Click on the image to your left and set into the next paragraph; this opens a full-size view of the controls in a seperate window. Switch between this window with the text, and the large image as we look at its features.
For your amusement, we include for you a situation where the simulator stopped my run because I violated the rules.
In actual fact, I had forgotten that there was a red light on this downgrade and round this bend, because I had not been paying attention. I was more concerned in taking captures, which was really rather stupid when driving a train. Like a real train driver who is also a railfan.
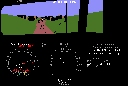
You can see that all aspects of the approach signal to our terminus are at red. The next frame shows that emergency brake was applied, but it was far too late.
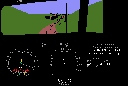
Approaching Bridgwater after leaving Carripook platform (which isn't shown in the simulation), we sweep round a right-hand bend with a speed limit of 50, but with a yard limit of 30 about half a mile ahead. We have caught up a lot of our lost time, which in hindsight was unwise. The previous signal was at steady yellow, which meant the one coming up was likely to be at stop (red) when we reached it. It was.
Well, we have passed the red signal, still braking, and the simulation has instructed us to "press any key" because it had terminated the run. The next picture tells the story.
Lack of concentration on the route caused us to be going too fast to be able to stop in time, even with brake in "emergency" position. The program terminated the run with a terse message about over-running a red signal being dangerous. It still indicated some of the performance figures from the run...

Fuel consumption was less than the program expected, and this was largely due to having driven carefully earlier on, ensuring that stopping at signals was avoided due to being ahead of time. Stopping for a red signal on an upgrade will result in a much greater fuel consumption.
The object is to show that you can keep to time, obeying all the rules, using as little fuel as possible, causing as little wear as possible on brake shoes, and without any risk to your train and contents.
The rest of the scores were zero, because of having breached the most very basic rule.
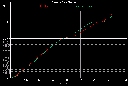
Here we see the distance versus time graph. You will observe how we had run consistently behind the schedule by about a minute until Belair.
On the next major section from Belair to Mount Lofty we were consistently early, due to inattention.
Consequently there was a long wait at Mount Lofty because of having to cross a train coming in the other direction (which we did not see), and the simulator also made that run behind time, resulting in our late departure from Mount Lofty.
Catching up time on a route with predominately down grades (and sharp curves) from there on was unwise. It resulted in the red signal over-run.
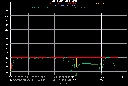
This screen analyses the speed along the whole route from start to the termination point. We see boundary lines for track speed (red), train speed (yellow).
Our progress is shown by a light green line, We can see we were 2mph above the limit all the way from Torrens Park to the middle of the Sleeps Hill tunnel, and a bit later between Blackwood and Glenalta we again exceded the limit by about 2mph. The dark green line shows the scheduled speed over the same route.
We hope you enjoyed our journey and the evaluation at the end of it...
If you purchase a registered version from Jens Schubert, you will be able to run Australian trains on Australian routes - at least on this Australian route. Please enjoy!
Thank you for visiting, and for your interest. Please feel free to email me your comments.
If you take the "next" link below, you can go on a photographic trip along the route from Sleeps Hill to Bridgewater. Since 1994 this has not been possible because railcar passenger services were withdrawn sometime before the 1995 gauge standardisation.
| 


