Adelaide to Bridgewater This page may also take quite a while to load, because it is image intensive. Please be patient. If you are using "caching" on your computer, you may find that on a second visit it will load quicker... As before, click on the image to your left and set into the next paragraph; this opens a full-size view of the controls in a seperate window. Switch between this window with the text, and the large image as we look at its features.
The dual track railway line curving to the left runs into a deviation, the construction of which was completed in late 1919, replacing a route comprising two single track tunnels with a quarry between them, and a single track lattice girder bridge over a very deep ravine, the latter on a very tight curve.
This photograph is a view from well above the trackside, and it shows the northern portal of Sleeps Hill Tunnel. Taken from high ground on the western side of the railway line, it clearly shows the hillside towering above the the tunnel bore. Now, in contrast, next we see the entrance to the northern portal of the earlier tunnel system.
The sloping brickwork above the tunnel mouth serves a similar purpose to the snow sheds of Alpine and Norwegian railways - although while not preventing snow from landing on the tracks, it did prevent debris from the hillside from doing so! It should be noted that some of the photographs were not of particularly good quality, due in part to the lens system having become loose, and also an intermittently visible scratch. The camera was replaced after several rolls of film shot were processed and found to be faulty. Some later images on this site are obviously taken with a different camera.
From the map here, you may see both the original route, and the one which was opened in April 1919 through the one much longer tunnel which replaced the earlier system with dual track. 4 months after its opening, the second track was placed in service, and 2 months after that electric signalling was brought into use, making it one of the most modern main line railways in Australia. A significant amount of housing development down hill to the westawrd followed the closure of the two old shorter tunnels
The southern portal of this quite short tunnel under a low spur of hillside is seen here, and the picture shows the much lower level of ground above the tunnel; With the camera pointing in the opposing direction now, we can see a gentle curve to the left...
On the left hand side, out of view, is a large area excavated through quarrying. This activity continued here for many years after the railway tracks had been removed.
This tunnel has been used for many years for the cultivation of mushrooms, being leased from the State government.
The picture is actually a composite of two, as can be seen when you enlarge the image by double-clicking on it.
Here we see the fore-runner to the present "Overland", known in those days as the "InterColonial Express". Indeed, many people still refer to the train as the "Melbourne Express". Photo is courtesy the Port Dock Rail Museum archives, and shows two Rx class (Rebuilt R class), the date being around 1910. Down the bottom of the gorge, one can still see concrete footings and also two wheelsets off a small flat truck from when the viaduct system was dismantledsome 80 years ago.
Watiparinga creek runs from near Belair down through this gorge into the Shepherds' Hill Recreation Park as can be seen in a series of maps accessible here... From Darlington in the west to Belair National Park map1
The picture to the left is taken from trackside on the dual track line, and to the left can be seen a short cutting where the old route used to swing left on another s-bend, away from the present alignment, heading around to the viaducts.
It should be stressed that such photographs would be highly dangerous to take in normal circumstances, and that our party had to check in by telephone to Train Control when we had left the area to confirm that all members of the party were accounted for. The photograph was by the author, Reece Jennings, and pictures Webb steam locomotive 526 leaving the southern portal of Sleeps Hill tunnel with the 16:20 Tailem Bend passenger train ex Adelaide in February 1966.
At that time, National Park was not closed to either hiking or camping at night time. We returned several months later and camped overnight in the cave; in the morning we climbed the hillside to avoid crossing the railway line, and before so doing I took this photograph of an overnight freight train en route into Adelaide from Melbourne.
The second track was laid to the westward side of the exisiting one, and in 1995 when the 1600mm (5ft 3ins) main south line from Adelaide to Melbourne was converted to standard gauge, the extra height was useful for the higher loading of modern freight trains. The conversion also required the increasing of tunnel height in all the other tunnels between that point and Murray Bridge too. The photo above was shot from the front of a train to Bridgewater about a week before the series on the Sleeps Hill tunnel. It was during this journey that the camera lens system became loose.
The other track is designed for "normal speed" running and therefore has only a single aspect signal. There are actually three automatic signals placed in the block ahead which terminates in the very short loop for crossing passenger railcars at Long Gully. Note the red Start of CTC Working boards on both signal posts, and in the distance in the cutting we can see the line swing to the right on a 10 chain radius curve into the Belair National Park, and more s-bends on a continual climb of 1 in 40 (2.5%).
Here we see the letters R and N marked against the switch blades, indicating closure for Normal and Reversed operation. The two "black boxes" to the right are the switch motor and the switch lock.
We are approaching a beautiful location known as Foster's Corner which has been used for many years to get striking photographs.
and this is the other side of Foster's Corner, in National Park...  
 Above, on the left, we see a photograph taken by an Australian National staff photographer in 1985, and used by the Port Dock Rail Museum on the cover of their pulication "Line Clear: 100 years of train working Adelaide - Serviceton" In the centre and on the right, we see two photographs taken by myself 13 years later (and also in the early morning), which was unable to be taken from the same spot because of tree growth in the mean time. While a good shot, the extra height from further up the bank would have captured the shape of the train better as it snaked itself round the s-bend.
These tunnels have an interesting construction feature... there is a smoke gallery above the tunnel roof, which was an engineering attempt to remove the exhaust smoke of steam engines a century and a half ago.
It is of the same tunnel, but the eastern portal, photographed while travelling in the reverse direction. Again please note the automatic semaphore signal ahead. Also the effect of the setting sun shining through the trees and reflecting on the windshield of the railcar. Unfortunately passenger commuter railcar trains no longer run over this track, so it has not been possible to replace the pictures which suffered from the lens problem.
Normally automatic signals in these blocks will be half up if there is no train accepted into the block, so a shrewd guess suggested that the inbound Overland had already left Mount Lofty and Train Control had cleared the route all the way through to Belair. I decided to move quickly over the creek ahead of the tunnel, and on to the high ground on the cutting on the right hand side of the track in the distance. My hunch was rewarded about five minutes after arrival at an ideal photo spot of these three images of the "Overland" trundling downgrade very audibly whining in full dynamic brake    National Park platform is just that - an earth platform boxed in with old sleepers (ties). These pictures were taken a number of months later on a scouting trip.
The train is a late afternoon Adelaide to Melbourne Jet Freighter hauled by an Australian National BL class 3300hp EMD derivative, working with two Victorian Railways X-class 2000 hp EMD derivatives.
As you can see, double stack loading was not part of the Australian scene at that time.
You might like to go back and check the map on this one to see where we are... map 3.
This was a Saturday afternoon Victor Harbour Express passenger, and was specially posed for the photographer. Normally the engine would have been much further up the platform, as can be seen by the far end of the train still being on the climbing grade into the station. Engine 525 was just six months old at the time of the photograph, which comes from the Port Dock Museum archives and is published in "Line Clear" (previously mentioned).
To the right we see a no longer used siding. We shall take the right hand switch which leads at slow speed into the main platform, platform 1. The station building was burned down by vandals shortly after my visit, and unfortunately I did not get any photographs of it.
This photo is taken from the driver's position at the Adelaide end of the train.
The ancestry of the SuperChook is very evident here, although it was given an external face lift to look more like the Jumbo or Supertrain as we can see in the next picture 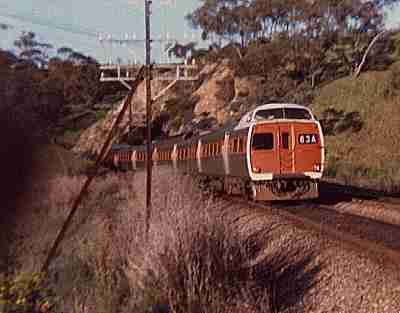  The refurbished Red Hen set was overweight unfortunately, and some compensation could be made by removing the trailer car and converting it to a 2-car set. As the unit was not compatible with any other rollingstock apart from Red Hens, after several years a decision was made to lay the unit up in the railcar depot in Adelaide. The suburban service beyond Belair was withdrawn in the late 1980s, and with gauge standardisation of the Adelaide to Melbourne route, it is no longer possible to run any Broad Gauge trains beyond Belair, nor to run any standard gauge trains into Adelaide station Standard Gauge passenger trains terminate at the Keswick terminal outside Adelaide.
|
|
back to "run" page |


