Starting up your cab ride in
RAILSIM® Australian Version
This page may take quite a while to load, because it is image intensive. Please be patient. If you are using "caching" on your computer, you may find that on a second visit it will load quicker...
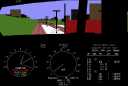
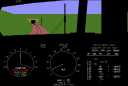
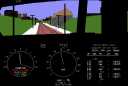
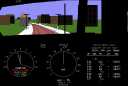
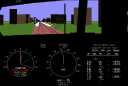
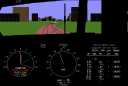
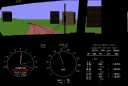
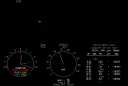
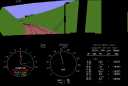
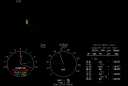
Okay, you are faced with the first screen of your ride, in which you see the instrumentation of the cab displayed underneath the front window.
Click on the image to your left and set into the next paragraph; this opens a full-size view of the controls in a seperate window. Switch between this window with the text, and the large image as we look at its features.
This is actually the first picture of our run, and we are sitting in Adelaide railway station in the southern-most platform, adjacent North Terrace.

There are two circular gauges... the right hand one is speed, in miles per hour; remember that this route is in "imperial" measurements - miles, tons, pounds per square inch of brake pipe pressure - no kilometres, tonnes, kilogrammes, kilopascals..
The left one is a composite gauge with five pointers... partly brakes, but other things too...
The red pointer is the brake cylinder pressure guage, and this shows that the brakes are partially applied at the moment.
The grey one is the pressure in the equalising reservoir.
The green pointer is the throttle position... currently at idle (0). It is calibrated from 0 to 8, representing the eight throttle power notches on US type diesel-electric locomotives when clockwise from the zero, and up to a maximum of eight anticlockwise representing dynamic braking. The fact that a 2000 class railcar has only three run positions and 3 braking positions is not relevant.
The white one shows acceleration or deceleration... this takes the place of the "seat of the pants" feel of the driver when adjusting throttle opening and/or braking to get the speed right.
The amber one is the traction current meter, on one traction motor as in real life.
Above the speedometer we see the time right now, in 24 hour notation, in hours, minutes and seconds. Below it is the distance travelled from the origin of the route - the origin being at 0.0 miles.
Below the speedometer we have the distance to the next signal or signpost ahead. Below this is the current speed limit, and below that is the grade in 0/00, not 0/0 (22 would be 2.2%), and then below that, the name of the section (if it has a name).
To the extreme right is a short section of the route ahead with mileage, section, arrival and departure times [passing through are shown within (brackets) ]. This scrolls up with the motion of the train along the route. Above all of that is a description of the motive power and type of train, listing its length, weight, and maximum permitted speed.
Now we are ready to start the run...
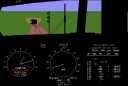
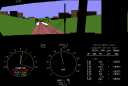
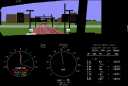
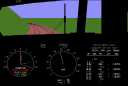
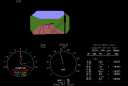
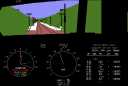
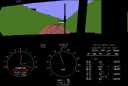
The previous shot showed us sitting in platform 2 of Adelaide railway station. Platform 1 doesn't show in the simulation; it is up against North Terrace. It doesn't show because RailSim termini have island platforms, Adelaide platforms 2 and 3 are island platforms, as are six other pairs of roads. In the distance we can see the Morphett Street Bridge which carries three lanes of road traffic in either direction from Light Square over North Terrace (to our left), the railways yards in the middle, and the River Torrens (to our right), on into the North Adelaide Parklands.
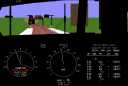
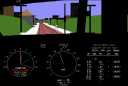
The brakes have already been released, the throttle cracked open, and the train has just started to move... look at the speedometer which is just above zero, the throttle is at 2 (approximately correct for a three position throttle in its first notch), there is forward acceleration, and there is power to the wheels.
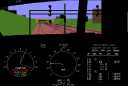
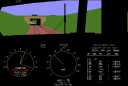
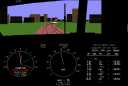
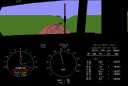
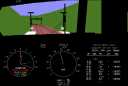
Clear of the platform, in the section approaching where the old Adelaide Station signal box was, we are almost at the platform's starter signal whose third aspect shows an amber "very slow speed, proceed with caution, next signal is not cleared" message. In real life, this meant 15mph, but 20mph is RailSim's limit. We are running at 18mph.
Note, from the timetable to the right, that there are three signals, located at 0.16, 0.41 and 0.66 miles from the start. We are at 0.13m, so the signal we are about to pass under is the one at 0.16m. The next signal is a quarter of a mile on, and a further one located a quarter of a mile further.
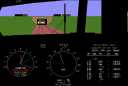
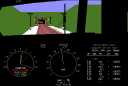
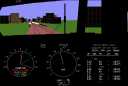
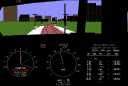
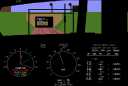
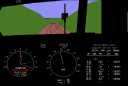
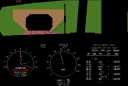
Approaching Morphett Street Bridge at 2 mph over the limit, the initial acceleration has fallen back, and the next operation will be to quickly lap and release the brakes to drop that excess speed, as we approach the signals at the end of the yard, which in the mean time have changed from stop to very slow speed, clear to next (which is obviously at stop). We are cleared on to the main line, in effect, as the next signal is there only because we have created a non prototypical left-hand single-track section to force left-hand running (to conform to Australian practice).
At 0.38 miles, 151 feet from the signal, we accelerate slightly after checking our speed, to negotiate a trailing switch, followed by a facing switch shortly afterwards, (you can just see its red aspect between the cutting on the left and the gantry column). We are therefore cautious - because of the possible need to stop within the next quarter of a mile, with perhaps standing passengers in the train.
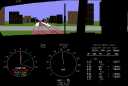
Swinging through 45 degrees to an approximately south-westerly direction, along the "bottom" of the Adelaide station "wye", we approach Port Road. In real life this is a quadruplicate main line, but we have reduced it to a single track (left hand track) as previously explained.
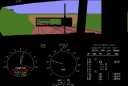
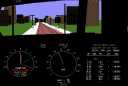
We are running at 6 mph, with no power attached, coasting towards the section end, about to pass under Port Road (a narrow 1940s road bridge which is a great bottle-neck to road traffic, with just two lanes in each direction). However, the signal is a triple red abolute signal, meaning a total stop before we reach it, unless it clears as we approach.
It did clear, just as we came to a stop. It showed amber over two reds - clear for the next section at "normal speed" - that is to say the minmum of the following factors...
train permitted maximum speed of 85 mph
section maximum speed of 50 mph
signal maximum speed of unlimited mph.
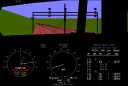
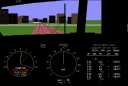
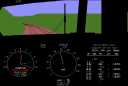
Still turning left, nearly running due south, we are now approaching the pre-war Bakewell Bridge, which has six tracks under it in real life. Roughly in the middle used to be the Mile End Junction signal cabin prior to the CTC era. The platforms of Mile End station can be seen as the track curves in a more southerly direction through the bridge arch. We are travelling at 46mph in the middle of the three throttle positions, with a slight acceleration to counter the drag introduced by the the curve resistance, helped a bit by a minimal downhill gradient.
Running due south through Mile End, approaching the Hilton Bridges (over four tracks here, plus the old Mile End Goods yard to our right in earlier days, with the new interstate passenger terminal sandwiched in between). The Mile End Goods passenger stop (removed in the late 1980s) is visible through the bridge.
Our timetable says we go straight through all of these, and checking the clock, we are about half a minute late (lateness due to signals is irrelevant).
We are running here at 46mph in the middle throttle position, and accelerating on a flat length of track which will shortly start climbing. Throttle is cut between here and the next shot, but the timing of that shows that it was slightly too soon. The signal a mile ahead is at amber, indicating that the following secion is also clear at normal speed.
At 48mph, the effect of the tiny rising gradient is noticeable, the train is decelerating slightly - too soon - so we shall need to open the throttle again before the next image. We are actually 40 seconds late here.
Keswick station is seen in the distance, just this side of Anzac Highway overpass (four lanes in each direction). This 1960's bridge carries the road traffic for an east-west crossing and a northeast-southwest crossing above the railway system. A complicated system of traffic lights ensure a road bottleneck at all times!
Approaching Keswick, still at 48mph, accelerating slightly, and having caught up a bit of time, with throttle open a bit and still climbing a 0.2%grade.
Our next signal is 0.34 miles ahead; this is the departure signal for Keswick, and it has turned green .
Nearly through Keswick, we see the Anzac Highway overbridge with the departure signal at the end of the platform. We can see through the bridge ahead to the Leader Street road crossing which carries traffic to and from the Wayville Showgrounds - located on our left between the bridge ahead and the grade crossing following it. Speed has now reached 50mph, with slight acceleration still.
While RailSim follows the AAR rules with a flashing amber meaning the same as an English or European double yellow, the South Australian Railways, and AN who inherited their system, never actually utilised this feature. However it does make driving the simulator a whole easier! As we roll through Keswick we are still about half a minute late.
53mph approaching Leader Street crossing, 3mph above the limit, a momentary oversight, but the gradient has increased to 0.4%, so between here and the next frame we reduce power to idle, and engage one notch of dynamic braking as we enter Goodwood with the south line diverging left from the Brighton line (to the right) with a curve to the southeast.
Station location isn't quite correct, the platforms don't curve here. It is a reasonable compromise, though.
Speed is back down to 50, and the throttle will be opened shortly as we encounter friction from the flanges on the bend, and the progressively rising grade en route to Mitcham along the next few miles of straight track.
Leaving Goodwood, with the route only cleared to the next signal (0.8 mile), we swing under the Glenelg tram line which carries the first ever standard gauge trackwork in South Australia.
The route is starting to steepen now, 0.6% and we shall restore power before the next frame.
Crossing Goodwood Road at Millswood (you don't see the road under the bridge in the simulation), it has steepened to 0.8% and power has been increased - at this moment it is in the equivalent notch to the middle position of the 3-position controller.
Speed has dropped back to 48mph.
Approaching Unley Park, we can see the next signal is at amber, the road is clear through to Mitcham, but not beyond.
Speed has risen to 51mph, but now with barely any acceleration, and the gradient has steepend to 1.2%, so the decision to increase to maximum throttle will need to be made shortly if speed is not to fall off by the time we reach Mitcham.
Running into Hawthorn, with the next signal a mile ahead, hopefully now cleared, the speed is just above the limit but the train has started to decelerate.
The grade has increased to 1.4%, and we are running perhaps 15 seconds late. In all probability we shall get a straight run through as we attack the climb to Mount Lofty.

1.6% climb, entering Mitcham with its absolute departure signal at clear, meaning in all probability the road is clear through Sleeps Hill Tunnel. We shall have to see.
Speed is down to 50 and we are still decelerating slightly. Maybe time to apply more power as we roar through Mitcham without stopping.
Departing Mitcham, right on time, 49mph (1 below the limit) and heading into the bend that will take us parallel to the range as we really climb through to Sleeps Hill.
Immediately above us, at the top of the range, is Belair, now the terminus of the commuter service, but we shall not reach it for a further 8-1/2 miles and 11 minutes of 10-chain radius reverse curves and 1 in 40 continuous climbing.
Our speed is down to 48mph, and the grade is still 1.6% (1 in 60), as we swing round towards Torrens Park.
Next signal is 3/4 mile ahead between Clapham and Lynton. The buildings on each side of the track all the way have been non-prototypical, but these are the standard buildings the program places by the trackside.
0.35 of a mile further on, with the throttle moved into the second of its three notches. Speed is being maintained - without acceleration at this point as we roar through Torrens Park - wouldn't it be nice to have appropriate sound effects in the programme.
Almost 6 miles out, and just under three quarters of a mile to the next signal - which should be clear.
Clapham ahead of us, with just Lynton to go a mile further on, before we head up the side of Sleep's Hill and into the tunnel. We are on time, and experience shows that on this route, if you maintain maximum speed, you will get ahead of the timetable frequently, which will result in your having to stop and wait on a near 2% grade at a red signal, and this will result in very poor timekeeping thereafter.
Clapham, on time, working in mid throttle still at 46mph.
The next signal can be seen in the distance, and still clear.
We are still maintaining between 45 and 50mph up the 1.6% grade, and on leaving Lynton we shall be able to go to full throttle; delaying it until here will ease the noise on local residents' ears!
Passing under the Clapham starter signal, we can see the Springbank Road overbridge in front of us...
A minor level crossing is visible through the bridge, the other side of which is Lynton station..
Lynton, at 44mph, and the grade has stiffened to 1.8%; we are still fifteen seconds (approximately) behind schedule, which is good.
This station was one of several closed with the 1994-5 service rationalisation associated with the conversion of the right hand track to Standard Gauge, and the provision of crossing loops on the Broad Gauge that we are travelling on.
Finally we have left the "Adelaide Plains", and the last outpost of suburbia... our next glimpse of habitation will be below the prestigious "Bellevue Heights" area south and west of Belair, several miles on.
At full throttle, and accelerating, we swing left towards the south-east to enter the northern portal of Sleeps Hill Tunnel, constructed as a shorter deviation in the 1920s from the original two tunnel and trestle viaduct route to Eden (now called Eden Hills).
Speed has lifted from 45mph to 47mph, still slightly accelerating as we continue the swing to the left, hugging the hillside.
Just around the corner, the old route would diverge to the right in the cutting... while the tunnels are still there in real life, they are not visible on the simulator,
and you can just see the right-hand corner of the signal gantry at the tunnel portal starting to appear - a black mark on the left side of the windscreen.
Actually, signals were not usually placed on gantries in South Australian Railways practice... occasionally there were two signals on a single mast, more usually they were two individual signals to the left of each trackside.
The gradient is now 2%, and the speed has stabilised at 47mph.
Sleeps Hill Tunnel is absolutely straight, but is inclined 2% vertically (1 in 50). This tunnel is nearly a mile in length.
There is a sharp approach/departure curve in opposite directions at each end.
Our speed is still 47mph here, at maximum throttle, struggling to climb this 2% gradient.
At 8.2 miles out from the start, we have climbed 316 feet, with another 1095 feet to travel upwards before we reach the summit at Mount Lofty. We are still on time.
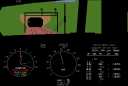
The portal at the other end of the tunnel moves painfully slowly towards us - yet with a freight train it moves even slower - as we inch our way heading up-hill.
Here, just inside the southern portal, we can see the track ahead of us turn to the right in a 10-chain radius (220 yards) curve.
Moments later we cross Watiparinga Creek - almost a narrow gorge - on a solid embankment, perhaps 100 yards long, a contrast to the original route over trestles whose concrete block foundations still stand - even with a set of wheels that fell during its dismantling eighty years ago.
Still at 47mph, on a 2% grade, and now pitting horsepower against a tight curve with flange lubricators on the track, we head towards habitation again - there are buildings on the skyline, the suburbs of Bellevue Heights and Eden Hills.
Next station (at which we don't stop) is still three quarters of a mile away, with a departure signal which the last one tells us should be clear, or maybe clear to stop at the following. So, we press on at full throttle.
Eden Hills is actually around that left-hand corner ahead.
Concentration is prone to wander in such situations, making it very easy to run a red light you suddenly encounter. That is just as true in real life as in driving a simulator. We have 0.79 mile to that signal, and the one after it is a mile and a quarter further on.
Half a mile to go to that signal, now. We can just see the end of the platform at Eden Hills here.
We have done well on the timetable - we are still very close to being on time, despite running consistently below the overall speed limit.
As we approach the station we can see the starter signals at the far end. Because the track veers to the left under the top of the hill, we cannot yet see the signal for this track. This is an important reason to stay within the timetable, as if it is currently red, it is likely to be clear by the time we reach it.
If we were ahead of time, we would need to take power off here to be able to stop comfortably for our passengers, if necessary, with the added problems of restarting on a steep gradient, and getting back up to speed at all.
We are still fifteen seconds late by the timetable, and as you can see, the signal had cleared when you first saw the colour of its aspect.
Our speed is still 47mph, accelerating very slightly, and the next signal is about a mile and a quarter ahead.
The western portal of the Eden Hills Tunnel... in real life this is two seperate single-track bores through the rock of the hill.
Unfortunately, RailSim does not permit seperate single track tunnels in double track sections.
Like all of the other tunnels apart from Sleeps Hill, this one is on a curve, and is about half a mile long
Approaching the eastern portal from within, we see the curvature of the tunnel. We are exactly ten miles out from our starting point, and have taken seventeen minutes to travel this far.
Three quarters of a mile on from its other portal is the next signal.

Out in the cutting again, and round the s-bend is the next dormitory hamlet - Coromandel - named after the extremely beautiful Coromandel Valley on the other side of the ridge to our right.
The bends have taken us back through 180 degrees and we are heading almost due north at the moment, about to meander east and then north again.
Still maintaining 46mph at full throttle, we swing eastwards into Coromandel and charge through it with our express commuter train.
The decision to run half a minute behind the timetable has consistently resulted in clear signals on this run... we are still very close to being exactly on time. We need to remember that we shall encounter a speed restriction at Belair because the route narrows to single track (right-hand track) which will result in a 20mph movement through the trailing switch at the far end of the yard.
This is the temporary end of this cab-ride demo - just for the moment. Please come back, we may create the whole section from Adelaide to Bridgewater in due course.
Because of the time it takes for images to load, we shall need to break the ride up into sections if we do complete the ride in this form.
You may take a side track and look at some real life photographs now, taken along the route... the link here will open in a new browser window.
Having completed the journey, we are presented with several screens of information which give us feedback on how well we performed at the controls...
|


